How to install Vynix on any website
Vynix adds an annotation widget to your website so developers and reviewers can click on the broken part of a page and capture the context needed to fix it. This guide explains how to add Vynix to a custom app, a CMS, or a site managed through a tag manager, then verify that element capture, screenshots, console logs, network context, and AI diagnosis are working.
What you are installing
Installing Vynix means adding a lightweight widget to the pages where you want feedback and bug reports. Once it loads, a reviewer can open the widget, click the part of the page that is wrong, and send context with the report. Instead of getting a vague message like "the checkout button is broken", your team gets the selected element, a screenshot, console and network context, and an AI diagnosis of the likely root cause.
The widget is usually added with a project-specific install snippet from Vynix. You do not need to rebuild your feedback flow around it. The point is to keep the report close to the broken UI and preserve the browser state that developers usually have to ask for later.
After a report is captured, you can copy a ready-to-build prompt or open a GitHub issue and assign it to a coding agent. That makes installation worth doing on any environment where people find real UI problems: staging, QA, preview deployments, internal tools, or production if your team wants to collect issues there.
Decide where the widget should run
Before you paste the install snippet anywhere, decide which environments should load Vynix. Many teams start with staging or preview deployments because those are safe places for designers, product managers, QA testers, and developers to annotate bugs before a release. Others add it to internal admin tools or production pages that are only visible to signed-in staff.
This is also the right time to think about access. Vynix is useful when the right people can report issues, but you may not want the widget visible to every visitor on every page. Use the same controls you already use for scripts, layouts, routes, roles, or deployment environments.
- Use staging first if you want to test the install without affecting production users.
- Use production only where annotation is useful and appropriate, such as staff-only areas or beta flows.
- Avoid loading the widget on pages where your policy forbids third-party scripts.
- Check your content security policy if your site blocks external scripts, images, or network requests by default.
- Decide whether the widget should run on every route or only on specific product areas.
Install Vynix in a custom website or web app
For a custom codebase, the common path is to copy the Vynix install snippet from your Vynix project and add it to the shared layout that renders across the pages you want to annotate. In a traditional server-rendered app, that might be the main template. In a React, Vue, Svelte, Next.js, Nuxt, Astro, Rails, Laravel, Django, or Express app, it is usually the root layout, document template, or shared shell.
Place the snippet somewhere that loads in the browser on the target pages. If your framework separates server-only code from client-side code, make sure the Vynix widget is loaded only in the browser. A widget cannot capture clicks, screenshots, console output, or network context from server-only rendering because those things happen in the user's browser.
If your team uses environment variables, do not hard-code environment-specific values in several places. Keep the project-specific Vynix value in the same configuration system you use for analytics, error tracking, and feature flags. That makes it easier to enable Vynix on staging, disable it in local development, or use a separate setup for production if your team chooses to do that.
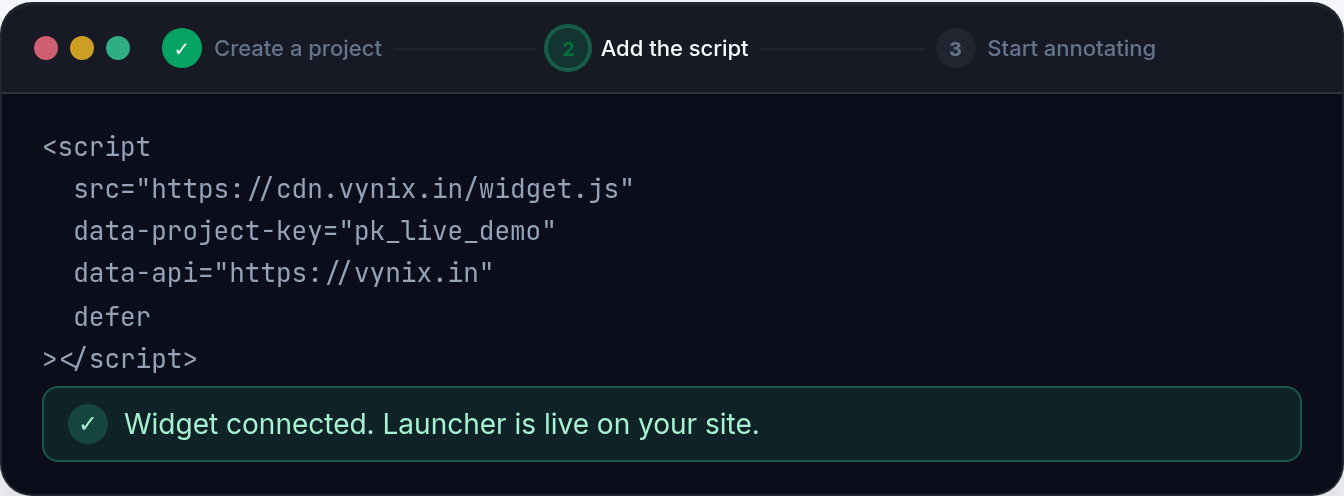
- Copy the project-specific Vynix snippet from your Vynix setup screen.
- Add it to the shared browser layout for the pages you want covered.
- Guard it by environment if you only want it on staging, preview, or staff-only production routes.
- Deploy the change using your normal release process.
- Open a target page in a real browser and confirm the widget appears and can be opened.
Install Vynix on a CMS, site builder, or tag manager
You do not need a full application codebase to use Vynix. If your website lets you add custom scripts, you can usually install the widget through the global code area, theme settings, or a tag manager. This is common for marketing sites, docs sites, help centers, and landing pages maintained outside the main product repository.
The exact screen name varies by platform, but the idea is the same: add the Vynix install snippet to the site-wide custom code area or create a tag that loads on the pages you choose. If the platform has separate areas for code that runs in the page head and code that runs near the end of the page, follow the placement guidance shown with your Vynix snippet. If the platform supports page rules, use them to limit the widget to the pages where annotation is useful.
Tag managers can be helpful when your development team does not control the CMS deploy process. Create a new custom script tag, paste the Vynix snippet, choose the trigger, publish it to a test workspace first, and verify that it loads only where intended. Be careful with broad triggers like "all pages" if you only want Vynix on a launch checklist, a private docs area, or a QA review path.
Verify the widget captures useful context
Do not stop after the widget appears. A visible widget only proves that the script loaded. You also want to confirm that it can capture the details your developers need when a bug report comes in.
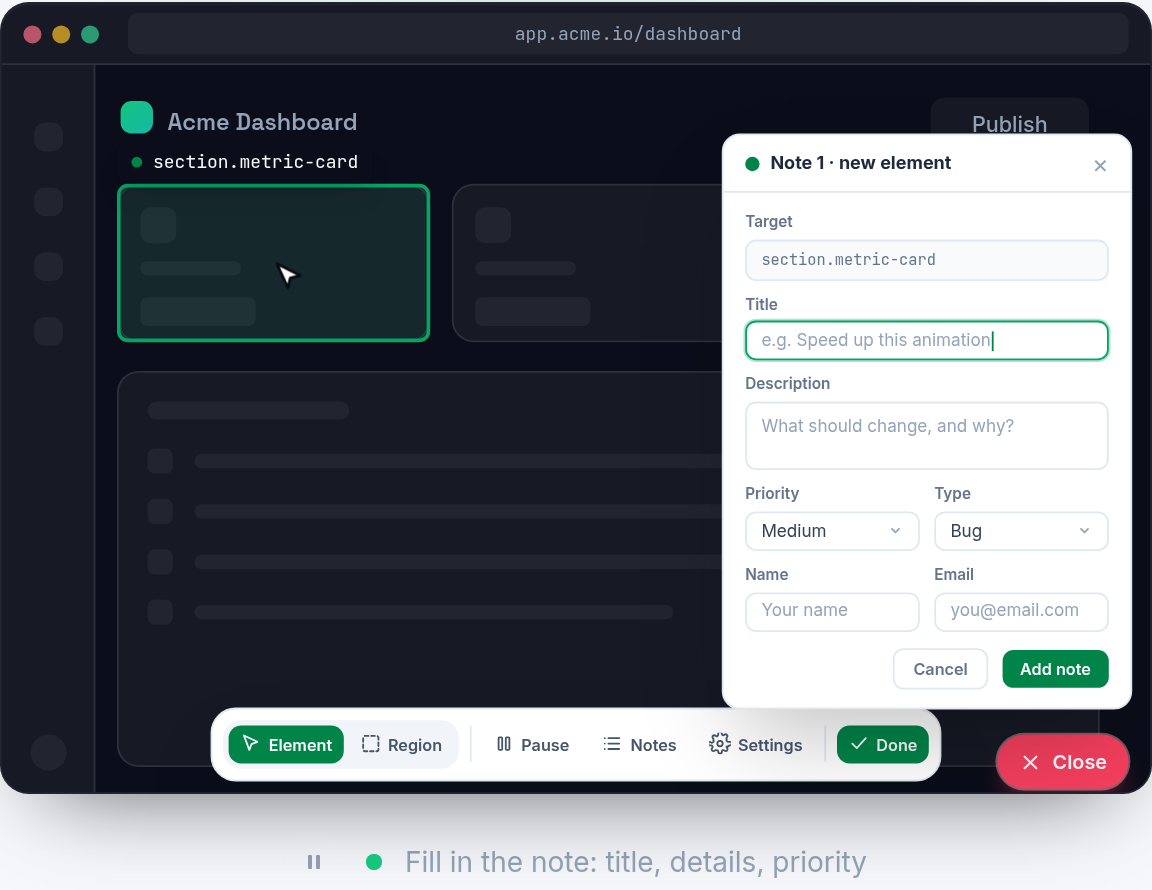
Use a page with a real UI element, such as a form field, filter, navigation item, card, modal, or checkout control. Open your browser console, create a harmless test warning if needed, and perform an action that triggers a network request. Then open Vynix, click the element you want to report, and submit a test annotation. Review the captured report and make sure the element, screenshot, console context, network context, and AI diagnosis are present.
A good test report should be specific enough that another developer can understand the page state without asking for a screen recording. For example, "Clicking Save on the billing address form leaves the button disabled after a 400 response" is much better than "Save does not work". Vynix helps by attaching the surrounding technical context, but the human note still matters.
- Confirm the widget opens on the intended pages.
- Click a specific broken or test element, not a blank area of the page.
- Check that the screenshot matches what the reporter saw.
- Check that console and network context are included when available.
- Try copying the ready-to-build prompt or opening a GitHub issue if that is part of your workflow.
Handle common install issues
If Vynix does not appear, first check whether the snippet is present in the rendered page. View the deployed page, not only your local source file. Many install problems come from adding a script to a template that is not used by the route being tested, or deploying to one environment while checking another.
Next, open the browser developer tools. The console can show blocked script errors, syntax errors caused by an incorrect paste, or content security policy messages. The network panel can show whether the widget script was requested and whether it loaded successfully. If you use a tag manager, also check whether the tag fired on that page and whether the latest container version was published.
Single-page apps can have another wrinkle: the initial page load works, but route changes replace large parts of the UI. If you notice that Vynix appears on the first route but not later routes, or captures the wrong page state after navigation, review where the snippet is mounted. It should be added at the application shell level rather than inside a component that is frequently destroyed and recreated.
If the widget appears for developers but not for testers, compare browser extensions, consent settings, network restrictions, authentication state, and role-based page rendering. The problem may not be Vynix itself. It may be that the tester is viewing a different route, a cached build, or a role that does not load the shared layout where the snippet was added.
Turn annotations into buildable work
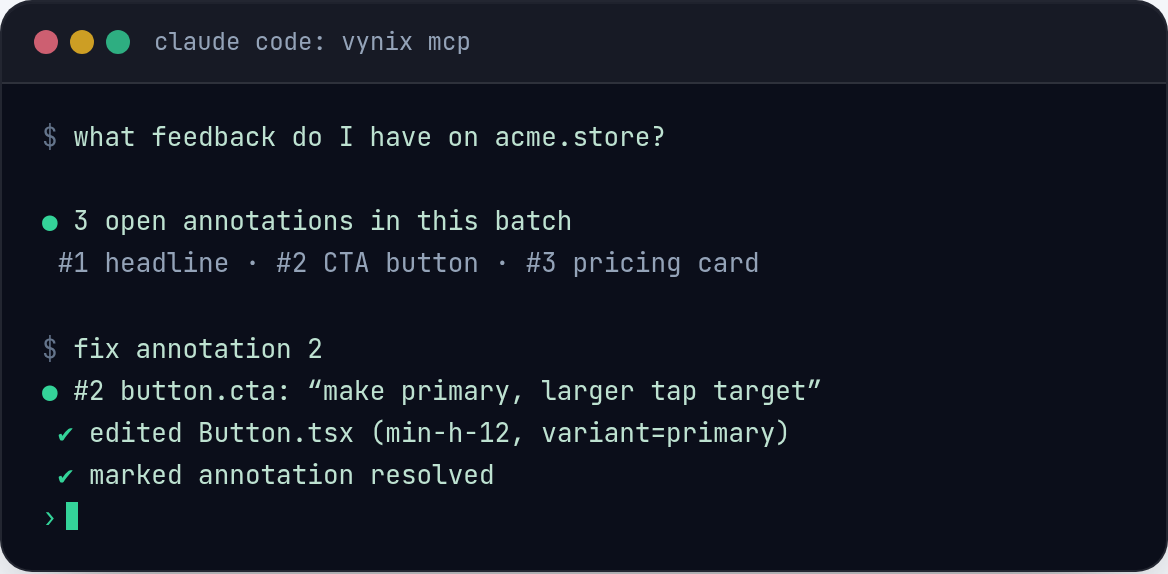
The real value of installing Vynix is not the widget by itself. It is the handoff from "something is wrong on this page" to a report a developer or coding agent can act on. When a reviewer clicks the exact UI element and sends context, the issue starts with far more signal than a chat message or a screenshot pasted into a ticket.
After verification, tell your team what a good Vynix report looks like. Ask reporters to describe what they expected, what happened instead, and what they clicked. Vynix adds the selected element, screenshot, console and network context, and AI diagnosis, but a short human note still explains intent.
From there, use the output in the way your team already works. If a developer is picking it up, copy the ready-to-build prompt and include it with the task. If your team tracks work in GitHub, open an issue from the report and assign it to the right owner or coding agent. The install is complete when a test annotation can travel from the website to the place your team fixes bugs.
- Install Vynix by adding the project-specific widget snippet to the pages where your team wants annotation and developer context.
- Start with staging or controlled routes, then verify element capture, screenshots, console logs, network context, and AI diagnosis with a real test report.
- A good Vynix setup turns a clicked UI problem into a ready-to-build prompt or GitHub issue that a developer or coding agent can act on.
Frequently asked questions
Can I install Vynix without changing my application code?
Yes, if your site supports custom scripts through a CMS, site builder, or tag manager. Add the project-specific Vynix snippet there and choose where it should load. For a custom app, you will usually add the snippet to a shared browser layout in the codebase.
Should Vynix run in production?
That depends on your workflow and policy. Many teams start on staging, preview deployments, or internal pages. If you use it in production, load it only where annotation is appropriate and make sure it fits your script, access, and data handling rules.
What should I test after installing Vynix?
Open a target page, launch the widget, click a real page element, and submit a test annotation. Confirm that the report includes the selected element, screenshot, console context, network context, and AI diagnosis. If you use GitHub issues or coding agents, test that handoff too.
Install the widget with one script tag, point at a bug, and hand the fix to your coding agent.
Get started free